A little security is better than no security :D If you are self hosting a wordpress.org blog on some shared server or VPS it is good idea to secure the Admin panel using HTTPS. I have recently enabled this security on this blog by using self signed certificate. Before we dig into details lets check some basics of SSL or HTTPS.
What is SSL?
SSL is the standard for exchanging information securely–via cryptographic encryption–between a website and the browser. SSL is a way to establish a trusted connection between the server and a web browser. Once that relationship is in place the server will encrypt data before transmitting it in a way that only its intended recipient i.e. browser can decrypt it.
This method of security accepts the fact that any data transmitted over the internet can, and likely will be, intercepted at anytime by a hacker or a government agency fishing for information. By sending the data encrypted, we ensure that if anyone but the intended recipient gets the data they will have what is effectively gibberish. Giving them gibberish is preferable to giving them confidential correspondence, private records, credit card numbers or any other private data.
Using SSL requires that your server has a valid SSL certificate installed. An SSL certificate, which must be purchased, tells the browser important details about your sites security. In most browsers, when you go to a secure site, you will see a lock or similar icon in the address bar, showing you details about the SSL certificate.
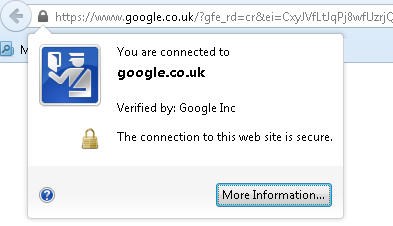
Once your SSL certificate is installed, when someone visits your website they will be able to access it via secure HTTP, or HTTPS. When we say “using SSL” what we mean is that the exchange of information between the server and browser is happening via the HTTPS protocol instead of the unsecured HTTP protocol. Doing so requires a valid SSL certificate.
What are Self-signed certificates?
As noted earlier in order to secure a website using HTTPS we need an SSL certificate. Usually to build the trust, the SSL certificate is issued from an authority known as Certificate Authority (CA) like Verisign. These CA issued certificates are also known as signed certificates. As they are usually issued by verifying the domain authority and business. Depending upon which CA is used, the domain is verified and a certificate is issued. Verisign and other more trusted CAs will verify the existence of the business in question and the ownership of the domain to provide a bit more security that the site in question is legitimate.
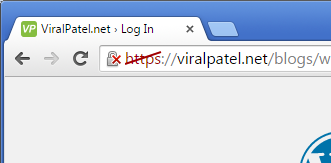
Due to all these verification steps, the signed certificates are not free. You have to pay a yearly fee to get a signed certificate from CA. To avoid this, self signed certificate can be utilised. Self signed certificates are exactly similar to signed one in terms of security. The only difference is that user will see a warning in most modern browsers if the site they are visiting is signed using self-signed certificate. So self signed certificate are best suited from test servers, Intranet applications or admin consoles for self hosted wordpress.
How to create Self-signed certificates?
First step to secure your wordpress admin panel using HTTPS is creating a self-signed certificate. There are number of tools you can use to generate certificates (openssl, Java keytool, Adobe Reader, Apple keychain). We will stick to the most common tool available on linux flavours like Ubuntu – openssl. Let’s get started.
Step 1: Verifiy is Openssl is installed
First check if openssl is available. Run following command and see if it gives openssl folder.
$ which openssl
/usr/bin/openssl
If openssl is not available then install the same using apt-get:
$ apt-get install openssl
We have openssl installed so lets proceed with other steps.
Step 2: Generate an RSA private key
First generate RSA private key using openssl. This key is a 1024 bit RSA key which is encrypted using Triple-DES and stored in a PEM format so that it is readable as ASCII text.
$ openssl genrsa -des3 -passout pass:x -out server.key 1024
Generating RSA private key, 1024 bit long modulus
...++++++
....++++++
e is 65537 (0x10001)
$
Private key is generated in file server.key.
Step 3: Remove Passphrase from server key
We need to remove the Passphrase from the server key. Otherwise everytime when Apache server will restart we have to enter this key. Its better we remove the passphrase key.
First create copy of server.key file.
$ cp server.key server.key.out
Next remove the passphrase key and overwrite it on server.key.
$ openssl rsa -passin pass:x -in server.key.out -out server.key
writing RSA key
Remove temporary file server.key.out
$ rm server.key.out
Now all we have left with is a server.key without any passphrase.
Step 4: Generate a CSR (Certificate Signing Request)
Let’s now generate a CSR file which we later use to create certificate. The CSR is used in one of two ways. Ideally, the CSR will be sent to a Certificate Authority, such as Verisign who will verify the identity of the requestor and issue a signed certificate. The second option is to self-sign the CSR, which will be demonstrated in the next section.
$ openssl req -new -key server.key -out server.csr
You are about to be asked to enter information that will be incorporated
into your certificate request.
What you are about to enter is what is called a Distinguished Name or a DN.
There are quite a few fields but you can leave some blank
For some fields there will be a default value,
If you enter '.', the field will be left blank.
-----
Country Name (2 letter code) [AU]:IN
State or Province Name (full name) [Some-State]:Karnataka
Locality Name (eg, city) []:Bangalore
Organization Name (eg, company) [Internet Widgits Pty Ltd]:ViralPatel.net
Organizational Unit Name (eg, section) []:
Common Name (eg, YOUR name) []:viralpatel.net
Email Address []:viralpatel.net@gmail.com

Please enter the following 'extra' attributes
to be sent with your certificate request
A challenge password []:
An optional company name []:
Step 5: Generate SSL self signed certificate
Let us generate the certificate using CSR and private key we created earlier.
$ openssl x509 -req -days 365 -in server.csr -signkey server.key -out server.crt
Signature ok
subject=/C=IN/ST=Karnataka/L=Bangalore/O=ViralPatel.net/CN=viralpatel.net/emailAddress=viralpatel.net@gmail.com
Getting Private key
Now we should have 3 files present in current directory.
$ ls
server.crt server.csr server.key
server.crt is the self-signed certificate and server.key is the private key.
Securing WordPress Admin with HTTPS
We can now install it in Apache and configure wordpress to use it.
Step 1: Moving the certificates to apache folder
Copy the newly created certificate and private key file in Apache’s SSL configuration.
$ cp server.crt /usr/local/apache/conf/ssl.crt
$ cp server.key /usr/local/apache/conf/ssl.key
for Ubuntu
$ cp server.crt /etc/ssl/certs/ssl.crt
$ cp server.key /etc/ssl/private/ssl.key
Step 2: Configure Apache to use SSL certificate
Let us enable the Apache’s SSL module and default-ssl site.
$ sudo a2enmod ssl
$ sudo a2ensite default-ssl
$ sudo service apache2 restart
Once you do that you will see /etc/apache2/sites-available/default-ssl file available in apache. Open the file and check if DocumentRoot is pointing to correct root.
<IfModule mod_ssl.c>
<VirtualHost _default_:443>
        ServerAdmin webmaster@localhost
        DocumentRoot /var/www/<user>/public_html/
        <Directory />
                Options FollowSymLinks
                AllowOverride None
        </Directory>
Almost done. Now enable wordpress SSL configuration for Admin.
Open wp-config.php file from your wordpress installation folder. And add following line.
define(‘FORCE_SSL_ADMIN’, true);Step 3 – Test your SSL Setup
Open your website in a your favourite web browser. If everything goes well, you’ll see a warning saying the certificate is not verified.
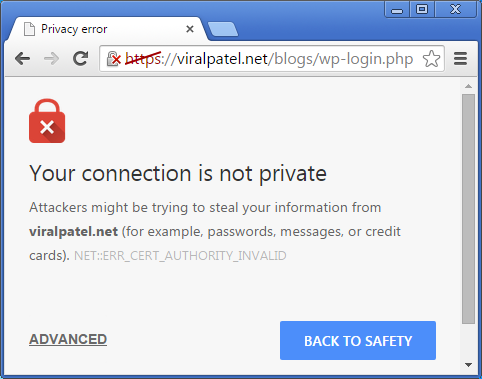
Accept the certificate exception. But before accepting it verify the SHA/MD5 fingerprints to make sure its yours.
That’s it. Your WordPress Admin dashboard is secured using HTTPS and self-signed certificate.


Thank you so much for these tips.
SSL certificates are expensive right? or is there cheap available?
They are not expensive, even they can be offered for free!
Is it paid or free?